Chapter 12: Managing Disks and Filesystems
12.1 Understanding Disk Storage
The fundamental principles of data storage are similar across most modern operating systems. Disks serve as permanent storage, while RAM (Random Access Memory) and swap space are used for temporary storage. For instance, when you run a command, it’s copied from the hard drive to RAM so the CPU (Central Processing Unit) can access it faster.
The CPU can access data from RAM much quicker than from the hard drive. However, because RAM is costly and data is lost when power is removed, disk capacity is far greater than RAM.
When RAM is full due to running too many processes or a process with a memory leak, if the system doesn’t provide a way to extend memory, new processes will fail. This is where swap space comes in. Algorithms are used to move some data from RAM to disk, and then swap it back when needed.
When you need to exchange files between different operating systems, the VFAT filesystem is commonly used.
12.2 Partitioning Hard Drives
Changing partitions can prevent your system from booting. It’s recommended to practice with an empty drive until you’re proficient before applying it to a live system.
12.2.1 Understanding Partition Tables
Traditionally, PC architecture computers used MBR (Master Boot Record) partition tables to store information about hard drive partition sizes and layout. However, in recent years, a new standard called GUID (Globally Unique Identifier) Partition Table has been adopted on some UEFI-based computers, replacing the older BIOS system boot method.
The inherent limitations of the MBR specification led to the need for GUID partitions. MBR partitions are limited to 2TB, while GUID partitions can create partitions up to 9.4ZB.
The fdisk command doesn’t support GPT partitions; you can use the parted command instead.
12.2.2 Viewing Disk Partitions
fdisk -l /dev/sda or parted -l /dev/sdb
SCSI or USB storage devices, represented by
sd?devices (e.g.,sda,sdb), can have up to 16 minor devices (e.g., the primary/dev/sdcdevice and/dev/sdc1to/dev/sdc15), totaling 15 partitions.NVMe SSD storage devices, represented by
nvmedevices (e.g.,nvme0,nvme1), can be divided into one or more namespaces (most devices only use the first) and partitions. For example,/dev/nvme0n1p1refers to the first partition in the first namespace on the first NVMe device.For x86 computers, a disk can have a maximum of 4 primary partitions. If you want more than 4 partitions, at least one must be an extended partition. Any partitions beyond the four primary ones are logical partitions, using space from the extended partition.
12.2.3 Creating a Single-Partition Drive
The general process for adding a storage medium:
- Install the new hard drive or insert the new USB flash drive.
- Partition the new hard drive.
- Create a filesystem on the new hard drive.
- Mount the filesystem.
If you’re using the
partedcommand for modifications, proceed with caution at each step, aspartedchanges take effect immediately. Thefdiskcommand, however, is reversible; changes are only applied when you explicitly confirm.Data is invaluable, handle with care.
Determine the name of the newly added device.
There are many ways, for example, by checking system logs:
journalctl -fFor example, let’s assume the assigned name is
/dev/sdb.If the device is auto-mounted, you need to unmount it first.
Check if
/dev/sdbis mounted:mount | grep sdbUnmount the partition:
umount /dev/sdb1Use the
partedcommand to create a partition.parted /dev/sdbAfter executing, you will be in
partedcommand mode. You can usepartedsingle-letter commands to manage partitions.Delete a partition.
The single command
plists all partitions.Use the
rmcommand, then press Enter and input the correspondingNumberto delete a partition.Create a GPT partition table.
Use the command
mklabel gptCreate a new partition.
Enter the
mkpartcommand. The system will prompt you for the partition name, filesystem type, and then the start and end of the partition.For example, name it yexca-UDisk, use xfs as the filesystem type, and partition from 1MB to 123GB:
1 2 3 4 5(parted) mkpart Partition name? []? yexca-UDisk File system type? [ext2]? xfs Start? 1 End? 123GBCheck if the partition was created correctly.
The single command
plists all partitions.After the partition is created, you need to create a filesystem on it.
For example, to create an xfs filesystem:
mkfs -t xfs /dev/sdb1If the
-toption is omitted, an ext2 filesystem is created by default.Mount the filesystem.
1
2
3
4
# Create the mount directory mkdir /mnt/tmp # Mount /dev/sdb1 to /mnt/tmp mount /dev/sdb1 /mnt/tmpUnmount the filesystem.
Use the command
umount /dev/sdb1By default, USB devices are generally auto-mounted when inserted.
If you need to manually mount, add a line to
/etc/fstab:1/dev/sdb1 /mnt/tmp xfs defaults 0 1This line has six fields:
- Partition
- Mount directory
- Filesystem type
- Mount options at boot (e.g.,
defaultsfor default options) - Whether to use the
dumpcommand to back up partition files (0 for no backup) - Filesystem check order (0 for no check, 1 for root, 2 for others)
12.2.4 Creating a Multi-Partition Disk
Using the fdisk command as an example:
Enter
fdiskcommand mode.fdisk /dev/sdbCreate partitions.
Single command
n, then choosepfor a primary partition orefor an extended partition. Select the partition number (default is usually fine).Then specify the allocated space. The starting sector can be default; after pressing Enter, input the ending space. For example, to allocate 5 GB, enter
+5G. If you enter a bare number, it will be interpreted as sectors.For the fourth partition, which would be an extended partition, you can accept the default for both start and end sectors.
Check partitions.
Single command
p.The default partition type is Linux. If you want to change the partition type:
Use command
t, select the partition number, then enterLto view the list of partition types. Find the hexadecimal code, then enter it to change.Review changes and save them.
Single command
pto review, single commandwto save changes.After making changes, check if the kernel is aware of the partition table modifications.
1
2
3
4
5
grep sdb /proc/partitions # If the expected output is not shown, execute the following command partprobe /dev/sdb # Check again grep sdb /proc/partitionsCreate filesystems.
 1
 2
 3
 4
 5
 6
 7
 8
 9
10
# Create an ext4 filesystem mkfs -t ext4 /dev/sdb1 # Create swap space mkswap /dev/sdb2 # Create an ext2 filesystem (default) mkfs /dev/sdb3 # Create a VFAT filesystem mkfs -t vfat /dev/sdb4 # Make this partition an LVM physical volume pvcreate /dev/sdb5
12.3 Managing Partitions with Logical Volume Management
If disk space runs out, you might have to copy data to a larger disk, a process that requires downtime and is inefficient.
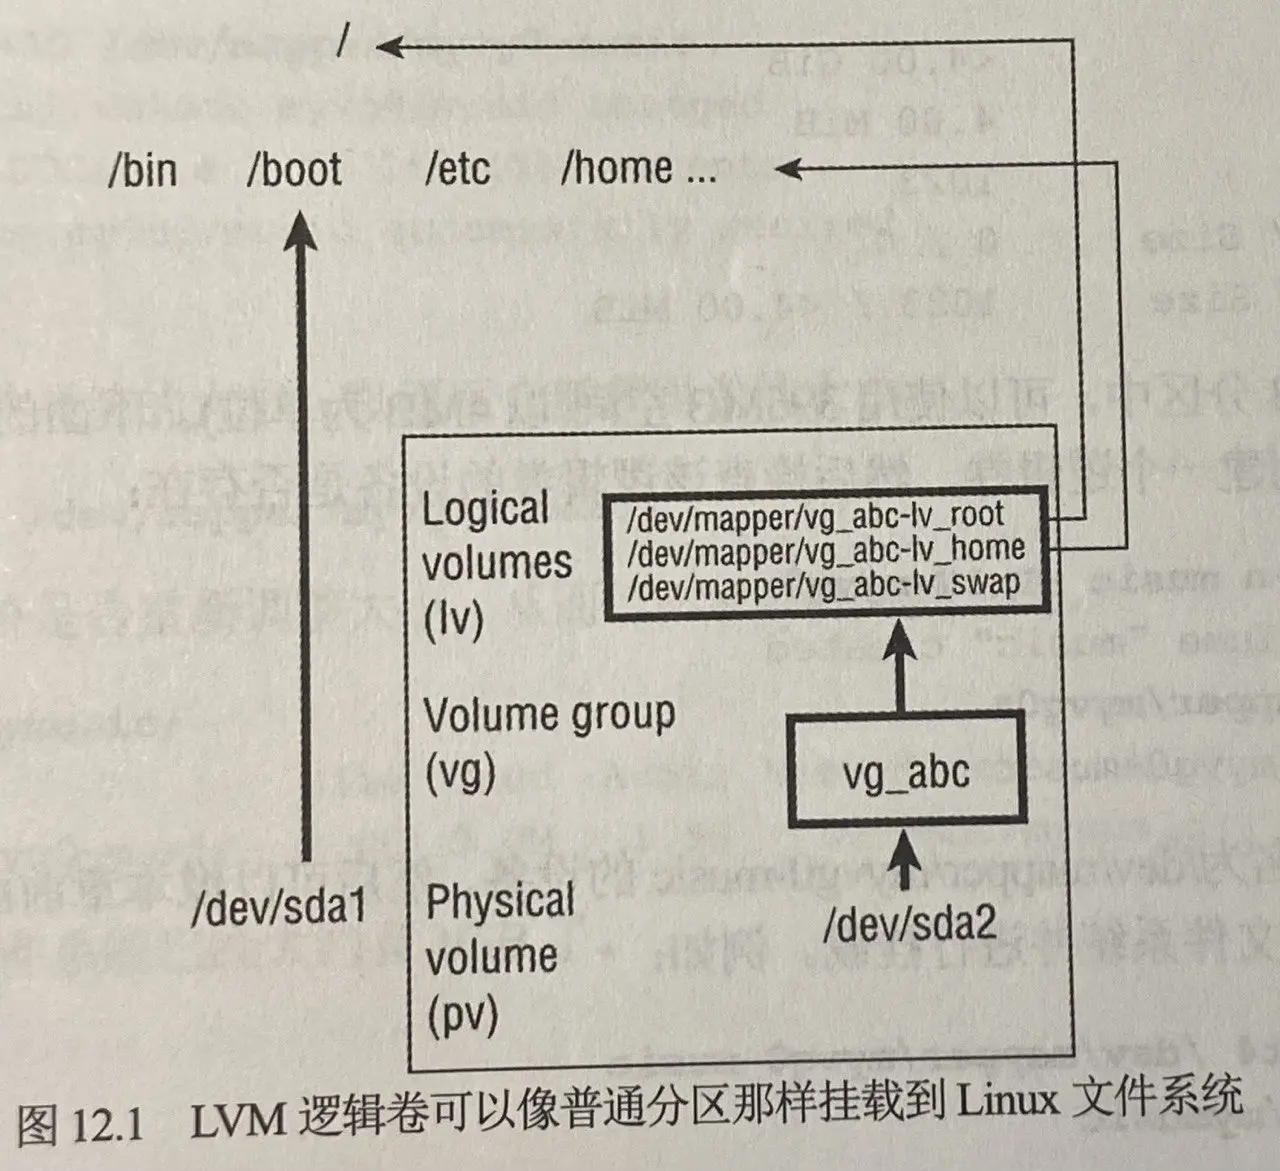
LVM (Logical Volume Management) provides a flexible and efficient way to handle changing storage requirements. With LVM, you can add physical disk partitions to a pool of space called a volume group. Logical volumes then allocate space from the volume group as needed.
12.3.1 Checking Existing LVM
Use the command fdisk -l /dev/sda to check for existing Linux LVM partitions. Let’s assume /dev/sda2 is an LVM partition.
Check if this LVM partition is used in an LVM group:
pvdisplay /dev/sda2
Assuming the volume group (VG Name) is vg_abc, view the volume group information:
vgdisplay vg_abc
From this, you can see the PE (Physical Extent) Size, which is the minimum storage unit used by the physical volume.
View the allocation locations of the volume group’s PEs:
lvdisplay vg_abc
The output will show multiple logical volume names. These logical volumes can be mounted directly by name, just like physical volumes.
12.3.2 Creating LVM Logical Volumes
Using LVM logical volumes is a top-down process, while creating them is a bottom-up process. First, create one or more physical volumes (pv), then use the physical volumes to create a volume group (vg), and finally create logical volumes (lv) from the volume group.
Prepare a storage device with an LVM partition.
The creation process was mentioned in 12.2.4.
Add this physical volume to a volume group.
vgcreate myvg0 /dev/sdb5View the volume group.
vgdisplay myvg0If the partition is 400M, you can use 396M of space (in 4M units).
1
2
3
4
5
6
# Create a logical volume from a portion of the volume group space, e.g., create a 1G logical volume lvcreate -n name -L 1G myvg0 # Check if the logical volume exists ls /dev/mapper/myvg0* # If the following output is shown, creation was successful /dev/mapper/myvg0-nameCreate a filesystem and mount it.
1
2
3
4
5
6
7
8
# Create an ext4 filesystem mkfs -t ext4 /dev/mapper/myvg0-name # Create a mount directory mkdir /mnt/tmp # Mount mount /dev/mapper/myvg0-name /mnt/tmp # Check if mounting was successful df -h /mnt/tmpAlternatively, you can add an entry to
/etc/fstabfor automatic mounting.
12.3.3 Extending LVM Logical Volumes
If you run out of space on a logical volume, you can add space without unmounting it. To do this, the volume group must have available space, and then you can extend the logical volume.
Check remaining space.
1
2
3
4
# Check available space in the volume group vgdisplay myvg0 # Check available space in the logical volume df -h /mnt/tmpExtend the logical volume.
lvextend -L +1G /dev/mapper/myvg0-nameResize the filesystem.
resize2fs -p /dev/mapper/myvg0-nameCheck if resizing was successful.
df -h /mnt/tmp
12.4 Mounting Filesystems
In fact, the mount command and automatic mount configuration (the /etc/fstab file) have already been covered in the previous two sections.
12.4.1 Supported Filesystems
Enter the command cat /proc/filesystems to view supported filesystem types. The following is just a partial list:
| Filesystem | Description |
|---|---|
| ext4 | Successor to the popular ext3 filesystem. Supports volumes up to 1EB and files up to 16 TB. |
| iso9660 | Evolved from the High Sierra filesystem (the original standard for CD-ROMs). Data CD-ROMs typically use this filesystem. |
| Minix | Originally used for the Minix version of UNIX. Supports filenames with a maximum of 30 characters. |
| msdos | MS-DOS filesystem type, can be used to mount floppies from Windows operating systems. |
| vfat | Microsoft’s extended FAT filesystem type. |
| exfat | An extended FAT filesystem optimized for SD cards, USB drives, and other flash memory. |
| proc | Not a true filesystem. It’s a Linux kernel filesystem interface. The /proc mount point should be a proc filesystem. Many utilities rely on /proc to access Linux kernel information. |
| ReiserFS | A journaling filesystem. Once the default filesystem for several Linux distributions, but now ext and xfs are more common. |
| swap | Used for swap partitions. |
| squashfs | A compressed and read-only filesystem type. |
| NFS | Network Filesystem, used to mount filesystems on other Linux or UNIX computers. |
| ntfs | Windows NT filesystem. |
| xfs | A high-performance filesystem originally developed by Silicon Graphics, excellent for handling large files. |
| gfs2 | A shared-disk filesystem that allows multiple computers to use a shared disk to communicate without going through a network filesystem layer, such as CIFS, NFS, etc. |
Enter man fs to learn more about Linux filesystem-related information.
12.4.2 Enabling Swap Space
| |
If you’ve added a swap partition entry to /etc/fstab, such as:
/var/opt/myswap swap swap defaults 0 0
You can enable it using swapon -a.
12.4.3 Disabling Swap Space
swapoff /var/opt/myswap
12.4.4 Defining Mountable Filesystems with fstab
As introduced in 12.2.3, the second field can use UUID instead of the device name, because device names can change.
View UUIDs: blkid
12.4.5 Mounting Filesystems with the mount Command
Also introduced in 12.2.3.
12.4.6 Mounting Disk Images in Loopback Mode
This involves mounting an ISO image file.
| |
12.4.7 Using the umount Command
You can specify either the device partition name or the directory name.
Device partition name: umount /dev/sdb1
Directory name: umount /mnt/tmp
Typically, it’s better to use the directory name.
If a directory is busy and cannot be unmounted, you can:
- Lazy unmount:
umount -l - Force unmount:
umount -f
12.5 Managing Storage with Cockpit
GUI. Refer to Chapter 8 for activation.