📢 This article was translated by gemini-3-flash-preview
This article was written by
Hiyoung
Original article:
https://blog.hiyoung.icu/2022/12/15/997871bc263d/
VS Code is just a plain text editor, not an IDE (Integrated Development Environment). It doesn’t include a compiler or many other features, so you need to install the compiler yourself.
Step 1: Download the software from the VS Code official website:
Visual Studio Code – Code Editing. Redefined
Step 2: We need to download a compiler. For C, we use GCC. Link:
MinGW-w64 – for 32 and 64 bit Windows download | SourceForge.net
. Select x86_64-posix-seh from the latest version. The website download might be slow, so here is a Baidu Netdisk link provided below.
(Baidu Netdisk “Rapid Transfer” link: b48357234368d9ba439fc0db6e86531d#84cbf1dc60abe4fff77d035540ea3132#140697937#mingw64.zip)
(Standard Baidu Netdisk link:
https://pan.baidu.com/s/17FYT\_Y-s-I2yajFc2MICqw
Code: ewis )
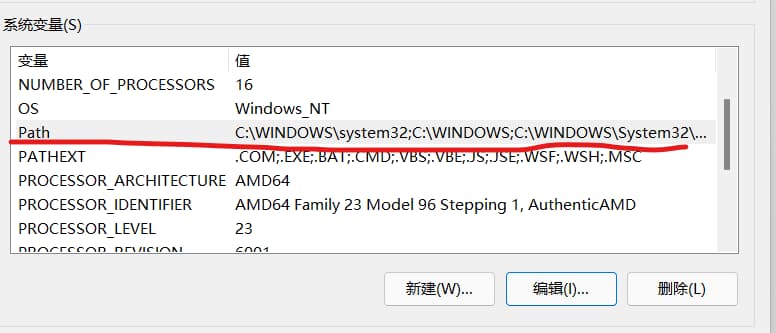
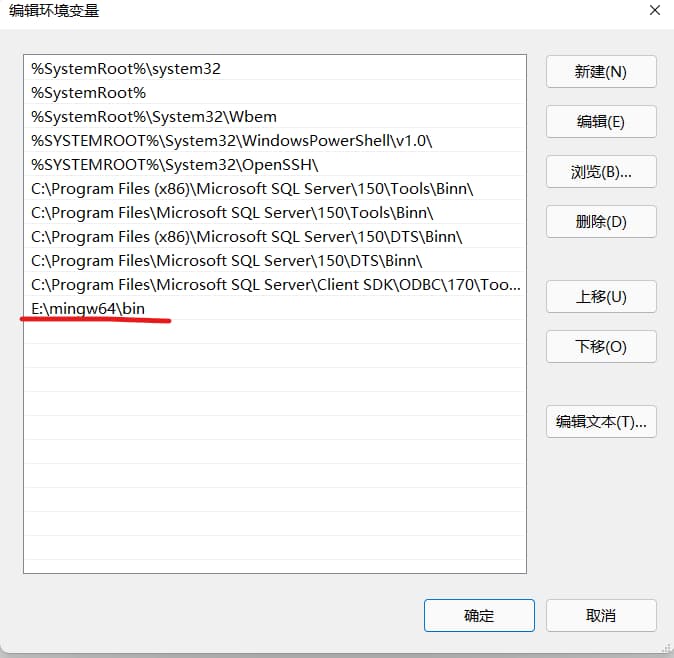
Step 3: Add E:\mingw64\bin to your system environment variables (adjust the drive letter based on your actual installation path).
For Win11: Open Settings -> System -> About -> Advanced system settings -> Environment Variables -> System variables -> Click Path -> Edit -> Browse -> Add the corresponding folder.
Step 4:
Press Win+R, run cmd (don’t skip this step). Type gcc. It should return no input files rather than “‘gcc’ is not recognized as an internal or external command” or “The term ‘gcc’ is not recognized as the name of a cmdlet, function, script file, or operable program.” If you see the latter, your GCC folder isn’t in the Path environment variable. If you added it and it still fails, restart your PC. If it still doesn’t work after a restart, you likely missed a step.
Type gcc -v to see the version. If the version displayed is different or older than the one you just downloaded, it means there’s an older compiler already in your Path (possibly from another IDE). You’ll need to remove the old GCC path from your Path variable.
These validations must pass; otherwise, you have to fix your environment variables. Just be careful not to delete important system entries.

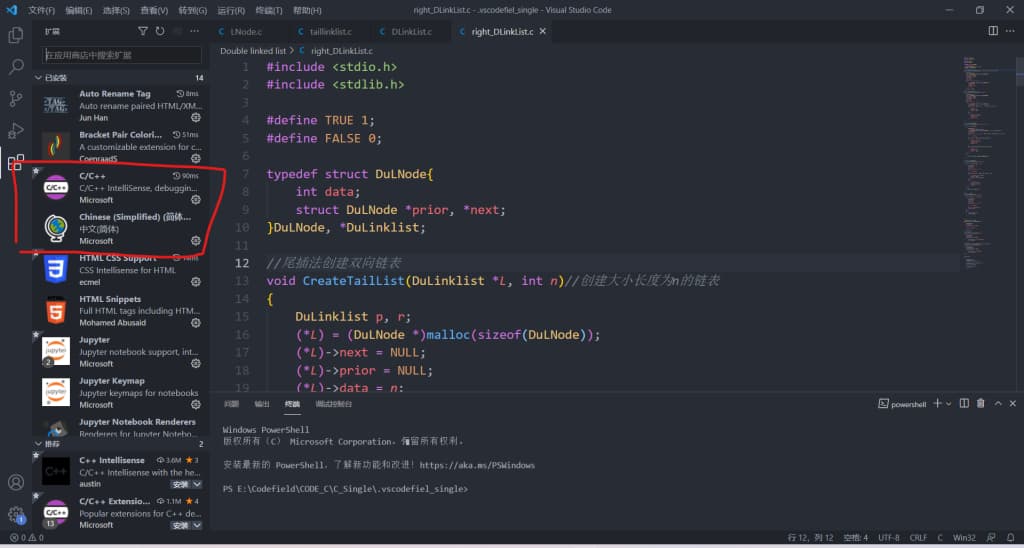
Step 5: Open VS Code and download the relevant extensions.
Step 6: We need to create two JSON files: launch.json and tasks.json (the filenames must be exactly these). Read the code comments carefully; there are several places in both files where you must change the path to your compiler’s actual path.
 1
 2
 3
 4
 5
 6
 7
 8
 9
10
11
12
13
14
15
16
17
18
19
20
21
22
23
24
25
26
27
28
29
| {
// Use IntelliSense to learn about possible attributes.
// Hover to view descriptions of existing attributes.
// For more information, visit: https://go.microsoft.com/fwlink/?linkid=830387
"version": "0.2.0",
"configurations": [
{
"name": "gcc.exe - Build and debug active file",
"type": "cppdbg",
"request": "launch",
"program": "${fileDirname}\\bin\\${fileBasenameNoExtension}.exe",// This means the generated binary will be placed in a 'bin' folder within the current directory. You need to create the 'bin' folder manually.
"args": [],
"stopAtEntry": false,
"cwd": "${fileDirname}",
"environment": [],
"externalConsole": false,
"MIMode": "gdb",
"miDebuggerPath": "E:\\mingw64\\bin\\gdb.exe",
"setupCommands": [
{
"description": "Enable pretty-printing for gdb",
"text": "-enable-pretty-printing",
"ignoreFailures": true
}
],
"preLaunchTask": "C/C++: gcc.exe build active file"
}
]
}
|
 1
 2
 3
 4
 5
 6
 7
 8
 9
10
11
12
13
14
15
16
17
18
19
20
21
22
23
24
25
26
27
28
29
30
31
32
33
34
35
36
37
38
39
40
41
42
43
44
45
46
47
48
49
50
51
52
53
54
55
56
57
58
59
60
61
62
63
64
65
| {
"tasks": [
{
"type": "cppbuild",
"label": "C/C++: gcc.exe build active file",
"command": "E:\\mingw64\\bin\\gcc.exe",// Change to your own file path
"args": [
/*"${fileDirname}\\*.c",
"-o",
"${fileDirname}\\bin\\${fileBasenameNoExtension}.exe",
"-g"// Multi-file compilation */
"-g",
"${file}",
"-o",
"${fileDirname}\\bin\\${fileBasenameNoExtension}.exe"// This means the generated binary will be placed in a 'bin' folder within the current directory. You need to create the 'bin' folder manually.
],
"options": {
"cwd": "${fileDirname}"
},
"problemMatcher": [
"$gcc"
],
"group": {
"kind": "build",
"isDefault": true
},
"presentation": {
"echo": true,
"reveal": "always", // Whether to jump to the terminal panel when executing the task. Can be always, silent, never. See VS Code docs for details.
"focus": true, // Setting this to true focuses the terminal when the task runs. For C/C++ compilation, true isn't strictly necessary.
"panel": "shared" // Compilation info for different files shares the same terminal panel.
},
"detail": "Task generated by debugger."
},
{
"type": "cppbuild",
"label": "(Multi-file) gcc.exe - Build and debug active file",
"command": "E:\\mingw64\\bin\\gcc.exe",// Change to your own file path
"args": [
"${fileDirname}\\*.c",
"-o",
"${fileDirname}\\bin\\${fileBasenameNoExtension}.exe",// This means the generated binary will be placed in a 'bin' folder within the current directory. You need to create the 'bin' folder manually.
"-g"
],
"options": {
"cwd": "${fileDirname}"
},
"problemMatcher": [
"$gcc"
],
"group": {
"kind": "build",
"isDefault": true
},
"presentation": {
"echo": true,
"reveal": "always",
"focus": true,
"panel": "shared"
},
"detail": "Task generated by debugger."
}
],
"version": "2.0.0"
}
|
That’s it for the basic setup. VS Code has many useful extensions to explore; I’ll write another post recommending some favorites in the future.