This article was written by Hiyoung
Original article: https://blog.hiyoung.xyz/2022/09/03/3256bd2afccc/
1. VM Settings
Go to Edit -> Virtual Network Editor. Select the NAT connection type. Set a subnet IP of your choice. Click NAT Settings to check the Subnet Mask and Gateway; you’ll need these later for the static IP configuration.
Under VMnet8, ensure NAT is selected and uncheck Use local DHCP service.
Click NAT Settings and note down the current Gateway.
In your host system’s network settings, verify the network configuration for VMnet8.
2. Linux Host Settings
With root privileges, run cd /etc/sysconfig/network-scripts to enter the directory. Use ls to list the files and find the ifcfg-en*** file, as shown below:
Open the file with vim ifcfg-en***.
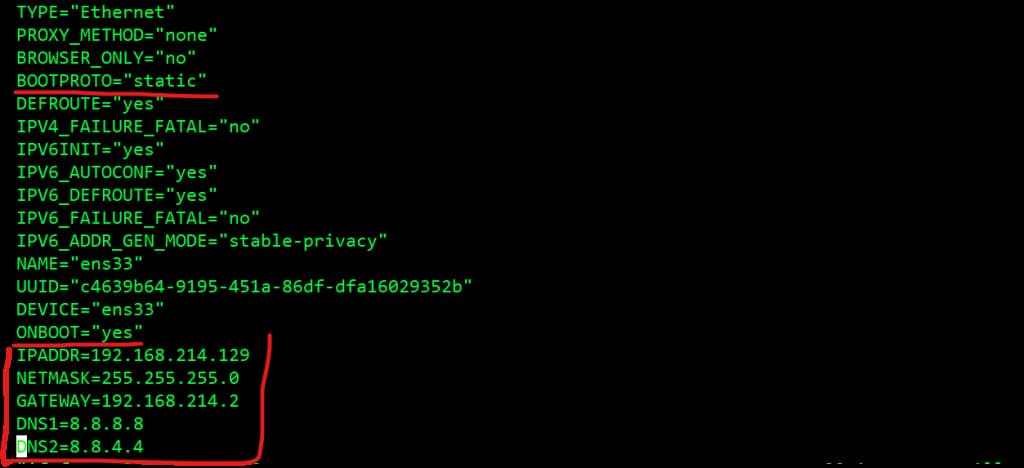
Change BOOTPROTO="dhcp" to BOOTPROTO="static" and ONBOOT="no" to ONBOOT="yes".
Add the following lines at the bottom:
IPADDR=your ip (Static IP address)
NETMASK=your netmask (Subnet mask, usually 255.255.255.0)
GATEWAY=your gateway (Gateway address)
DNS1=8.8.8.8 (Public DNS)
DNS2=8.8.4.4
Finally, type :wq to save and exit.